To sew apparels sewing machines are must that is used to stitch fabric and other materials together with the thread. Industrial sewing machines were invented during the first industrial revolution to minimize the human effort and save time in the year 1790 by Thomas Saint. After the invention it has become the most useful element of garment industry and now various types of them are already launched in commercial market. To get rid of human hand stitching sewing machine was invented though now it has become automated. It has given better efficiency and productivity to the manufacturing industries. Some China, Japan or Korean company have launched various types of sewing machine and it's further development is still on process. In each year we are being known to some new features of this machine, but still we need to know about the basic elements of a sewing machine and their function.
Different Parts of A Sewing Machine:

Foot Pedal:
It is a common element of sewing machine that controls the relatve speed of the machine depends on the force applied on it. For any high speed modern sewing machine speed can be adjusted by a push up button thus foot pedal is not the functional one for them.

Power Cord and Switch:
Now a days industrial sewing machines are run by electrical power so to get constant supplier of electricity power cord is to be set with the machine precisely. There is a on or off switch button to function it.

Hand Wheel:
It controls the movement of sewing needle as it used to lift up and down the need as per requirement to place the fabric cut panels beneath the tip. There is a clutch knob inside the wheel which acts as a safety measure of it and helps to avoid the needle from jabbing up and down during bobbin winding

Reverse Lever:
In a sewing machine it is placed at the front of it and is used to give secure stitch at the end of any stitch. Sometimes we call this operation as tack of the stitch.

Spool Pin and Holder:
Function of this pin is to hold the cone/any other package of sewing thread. Besides, it helps to control the thread direction and tension while it goes under operation of sewing.

Bobbin Winder:
Before placing the bobbin into case it is filled up with threads and the function is done through a bobbin winder.An empty bobbin can wind at less than one minute by a winder. It is usually placed at right top corner of the machine.

Pattern Selector and Stitch Length Adjustment:
It functions to select the type of the stitch to be given on the fabric. Like straight lock stitch, zigzag stitch it helps to control the stitch length thus SPI is controlled. It depends on the machine that how much variation can be done to sew any garment.
Length determiners is sit beside the pattern selector and it determines the length of the stitch. The length range is about to 0-4 where 0 is the shortest stitch and 4 is the longest one. This adjustment takes place at the feed dog.

Tension Disc:
Tension tension determines the looseness or firmness of the given stitch where tension disc controls the pressure applied to the thread for uniform feed to the machine needle. The basic funcsions of this device is -
There are of two different types device as direct tension device and indirect tension device. In high speed modern sewing machine, the tension dial with numbers graduated on it is used for varying the tension. The higher the number the greater the tension and vice versa. To get straight seam line tension needs to be adjusted correctly.

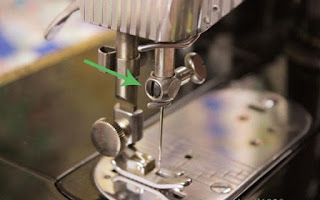
Needle and Needle Clamp:
The needle fits into the needle bar that holds it in place with a small screw. The clamp is really required to fix up the needle in correct place.
Take up Lever:
This lever moves up and down direction during the stitch formation to give the supply of thread while the loop is formed and taken back the needle thread after each stitching to set the stitch. Thread tension is also maintained at optimum level by this lever.

Presser Foot:
The pressure foot is very important element to perform the stitch. It helps to grab the fabric and place to the feed dog, thus the feed dog moves the fabric through out the machine. A downward pressure is applied by this device on the material.

Presser Dial:
The presser dial determines the amount of pressure to be applied on the fabric by the presser foot. The most light weight fabric needs maximum amount of presser to control the fabric in better way and thus vice versa.

Presser Foot Lever:
Functionally presser foot lever moves up and down to engage and disengage the presser foot on to the fabric respectively

Feed Dog:
This is the another most important part of sewing machine which looks like teeth that function in combination with the presser foot to move forward the fabric after performing one stitch. SPI is also be set that is regulated by the feed dog.

Face Plate:
It is just a cover that conceals all the internal working elements of the machine.

Throat Plate:
It's the upper part that covers the bobbin and the feed dog so that whole of the elect does not see from out side. It contains some slot for the feed dog and there is a hole to pass through the need to catch the bobbin thread.

Bobbin Case:
The bobbins are set into the bobbin case manually and then set it with the machine. This is placed under the needle plate and usually has a piece of plastic that flips up tot cover the bobbin case when sewing is not performed.

Bobbin:
A small package that is winded to carry out the sewing thread and is fitted into the bobbin case. Bobbin winder is used to filled it up and thread is evenly distributed while stitching is performed.

Different Parts of A Sewing Machine:
Image: Sewing machine and it's different parts
Foot Pedal:
It is a common element of sewing machine that controls the relatve speed of the machine depends on the force applied on it. For any high speed modern sewing machine speed can be adjusted by a push up button thus foot pedal is not the functional one for them.

Image: Foot Pedal
Power Cord and Switch:
Now a days industrial sewing machines are run by electrical power so to get constant supplier of electricity power cord is to be set with the machine precisely. There is a on or off switch button to function it.

Image: Power cord and switch
Hand Wheel:
It controls the movement of sewing needle as it used to lift up and down the need as per requirement to place the fabric cut panels beneath the tip. There is a clutch knob inside the wheel which acts as a safety measure of it and helps to avoid the needle from jabbing up and down during bobbin winding

Image: Hand Wheel
Reverse Lever:
In a sewing machine it is placed at the front of it and is used to give secure stitch at the end of any stitch. Sometimes we call this operation as tack of the stitch.

Image: Reverse Lever
Spool Pin and Holder:
Function of this pin is to hold the cone/any other package of sewing thread. Besides, it helps to control the thread direction and tension while it goes under operation of sewing.

Image: Spool pin and holder
Bobbin Winder:
Before placing the bobbin into case it is filled up with threads and the function is done through a bobbin winder.An empty bobbin can wind at less than one minute by a winder. It is usually placed at right top corner of the machine.

Image: Bobbin Winder
Pattern Selector and Stitch Length Adjustment:
It functions to select the type of the stitch to be given on the fabric. Like straight lock stitch, zigzag stitch it helps to control the stitch length thus SPI is controlled. It depends on the machine that how much variation can be done to sew any garment.
Length determiners is sit beside the pattern selector and it determines the length of the stitch. The length range is about to 0-4 where 0 is the shortest stitch and 4 is the longest one. This adjustment takes place at the feed dog.

Image: Pattern Selector and Stitch Length Adjuster
Tension Disc:
Tension tension determines the looseness or firmness of the given stitch where tension disc controls the pressure applied to the thread for uniform feed to the machine needle. The basic funcsions of this device is -
- Correct placement of the thread to the needle
- Regulate the flow of the thread
- Execute the stitching operation smoothly
- Ensure the thread passage properly
There are of two different types device as direct tension device and indirect tension device. In high speed modern sewing machine, the tension dial with numbers graduated on it is used for varying the tension. The higher the number the greater the tension and vice versa. To get straight seam line tension needs to be adjusted correctly.

Image: Tension Disc
Needle and Needle Clamp:
The needle fits into the needle bar that holds it in place with a small screw. The clamp is really required to fix up the needle in correct place.

Image: Needle and Needle Clamp
Take up Lever:
This lever moves up and down direction during the stitch formation to give the supply of thread while the loop is formed and taken back the needle thread after each stitching to set the stitch. Thread tension is also maintained at optimum level by this lever.

Image: Take Up Lever
Presser Foot:
The pressure foot is very important element to perform the stitch. It helps to grab the fabric and place to the feed dog, thus the feed dog moves the fabric through out the machine. A downward pressure is applied by this device on the material.

Image: Presser Foot
Presser Dial:
The presser dial determines the amount of pressure to be applied on the fabric by the presser foot. The most light weight fabric needs maximum amount of presser to control the fabric in better way and thus vice versa.

Image: Presser Dial
Presser Foot Lever:
Functionally presser foot lever moves up and down to engage and disengage the presser foot on to the fabric respectively

Image: Presser Foot Lever
Feed Dog:
This is the another most important part of sewing machine which looks like teeth that function in combination with the presser foot to move forward the fabric after performing one stitch. SPI is also be set that is regulated by the feed dog.

Image: Feed Dog
Face Plate:
It is just a cover that conceals all the internal working elements of the machine.

Image: Face Plate
Throat Plate:
It's the upper part that covers the bobbin and the feed dog so that whole of the elect does not see from out side. It contains some slot for the feed dog and there is a hole to pass through the need to catch the bobbin thread.

Image: Throat plate
Bobbin Case:
The bobbins are set into the bobbin case manually and then set it with the machine. This is placed under the needle plate and usually has a piece of plastic that flips up tot cover the bobbin case when sewing is not performed.

Image: Bobbin Case
Bobbin:
A small package that is winded to carry out the sewing thread and is fitted into the bobbin case. Bobbin winder is used to filled it up and thread is evenly distributed while stitching is performed.

Image: Bobbin
You Can Also Like:
- Garments quality checking in production
- Sewing thread consumption procedure
- International wash care instructions used in garments
- Garments costing procedure
- Progressive bundle system of garments production
- Garment production systems
- garment sewing machines overview
- Fabric consumption formula for woven garments
- Technologies of modern cutting room
Parts of Garments Sewing Machines | Function of Clothing Sewing Machines
Advertisements
To sew apparels sewing machines are must that is used to stitch fabric and other materials together with the thread. Industrial sewing machines were invented during the first industrial revolution to minimize the human effort and save time in the year 1790 by Thomas Saint. After the invention it has become the most useful element of garment industry and now various types of them are already launched in commercial market. To get rid of human hand stitching sewing machine was invented though now it has become automated. It has given better efficiency and productivity to the manufacturing industries. Some China, Japan or Korean company have launched various types of sewing machine and it's further development is still on process. In each year we are being known to some new features of this machine, but still we need to know about the basic elements of a sewing machine and their function.
Different Parts of A Sewing Machine:
Foot Pedal:
It is a common element of sewing machine that controls the relatve speed of the machine depends on the force applied on it. For any high speed modern sewing machine speed can be adjusted by a push up button thus foot pedal is not the functional one for them.
Power Cord and Switch:
Now a days industrial sewing machines are run by electrical power so to get constant supplier of electricity power cord is to be set with the machine precisely. There is a on or off switch button to function it.
Hand Wheel:
It controls the movement of sewing needle as it used to lift up and down the need as per requirement to place the fabric cut panels beneath the tip. There is a clutch knob inside the wheel which acts as a safety measure of it and helps to avoid the needle from jabbing up and down during bobbin winding
Reverse Lever:
In a sewing machine it is placed at the front of it and is used to give secure stitch at the end of any stitch. Sometimes we call this operation as tack of the stitch.
Spool Pin and Holder:
Function of this pin is to hold the cone/any other package of sewing thread. Besides, it helps to control the thread direction and tension while it goes under operation of sewing.
Bobbin Winder:
Before placing the bobbin into case it is filled up with threads and the function is done through a bobbin winder.An empty bobbin can wind at less than one minute by a winder. It is usually placed at right top corner of the machine.
Pattern Selector and Stitch Length Adjustment:
It functions to select the type of the stitch to be given on the fabric. Like straight lock stitch, zigzag stitch it helps to control the stitch length thus SPI is controlled. It depends on the machine that how much variation can be done to sew any garment.
Length determiners is sit beside the pattern selector and it determines the length of the stitch. The length range is about to 0-4 where 0 is the shortest stitch and 4 is the longest one. This adjustment takes place at the feed dog.
Tension Disc:
Tension tension determines the looseness or firmness of the given stitch where tension disc controls the pressure applied to the thread for uniform feed to the machine needle. The basic funcsions of this device is -
There are of two different types device as direct tension device and indirect tension device. In high speed modern sewing machine, the tension dial with numbers graduated on it is used for varying the tension. The higher the number the greater the tension and vice versa. To get straight seam line tension needs to be adjusted correctly.
Needle and Needle Clamp:
The needle fits into the needle bar that holds it in place with a small screw. The clamp is really required to fix up the needle in correct place.
Take up Lever:
This lever moves up and down direction during the stitch formation to give the supply of thread while the loop is formed and taken back the needle thread after each stitching to set the stitch. Thread tension is also maintained at optimum level by this lever.
Presser Foot:
The pressure foot is very important element to perform the stitch. It helps to grab the fabric and place to the feed dog, thus the feed dog moves the fabric through out the machine. A downward pressure is applied by this device on the material.
Presser Dial:
The presser dial determines the amount of pressure to be applied on the fabric by the presser foot. The most light weight fabric needs maximum amount of presser to control the fabric in better way and thus vice versa.
Presser Foot Lever:
Functionally presser foot lever moves up and down to engage and disengage the presser foot on to the fabric respectively
Feed Dog:
This is the another most important part of sewing machine which looks like teeth that function in combination with the presser foot to move forward the fabric after performing one stitch. SPI is also be set that is regulated by the feed dog.
Face Plate:
It is just a cover that conceals all the internal working elements of the machine.
Throat Plate:
It's the upper part that covers the bobbin and the feed dog so that whole of the elect does not see from out side. It contains some slot for the feed dog and there is a hole to pass through the need to catch the bobbin thread.
Bobbin Case:
The bobbins are set into the bobbin case manually and then set it with the machine. This is placed under the needle plate and usually has a piece of plastic that flips up tot cover the bobbin case when sewing is not performed.
Bobbin:
A small package that is winded to carry out the sewing thread and is fitted into the bobbin case. Bobbin winder is used to filled it up and thread is evenly distributed while stitching is performed.
Different Parts of A Sewing Machine:
Image: Sewing machine and it's different parts
Foot Pedal:
It is a common element of sewing machine that controls the relatve speed of the machine depends on the force applied on it. For any high speed modern sewing machine speed can be adjusted by a push up button thus foot pedal is not the functional one for them.
Image: Foot Pedal
Power Cord and Switch:
Now a days industrial sewing machines are run by electrical power so to get constant supplier of electricity power cord is to be set with the machine precisely. There is a on or off switch button to function it.
Image: Power cord and switch
Hand Wheel:
It controls the movement of sewing needle as it used to lift up and down the need as per requirement to place the fabric cut panels beneath the tip. There is a clutch knob inside the wheel which acts as a safety measure of it and helps to avoid the needle from jabbing up and down during bobbin winding
Image: Hand Wheel
Reverse Lever:
In a sewing machine it is placed at the front of it and is used to give secure stitch at the end of any stitch. Sometimes we call this operation as tack of the stitch.
Image: Reverse Lever
Spool Pin and Holder:
Function of this pin is to hold the cone/any other package of sewing thread. Besides, it helps to control the thread direction and tension while it goes under operation of sewing.
Image: Spool pin and holder
Bobbin Winder:
Before placing the bobbin into case it is filled up with threads and the function is done through a bobbin winder.An empty bobbin can wind at less than one minute by a winder. It is usually placed at right top corner of the machine.
Image: Bobbin Winder
Pattern Selector and Stitch Length Adjustment:
It functions to select the type of the stitch to be given on the fabric. Like straight lock stitch, zigzag stitch it helps to control the stitch length thus SPI is controlled. It depends on the machine that how much variation can be done to sew any garment.
Length determiners is sit beside the pattern selector and it determines the length of the stitch. The length range is about to 0-4 where 0 is the shortest stitch and 4 is the longest one. This adjustment takes place at the feed dog.
Image: Pattern Selector and Stitch Length Adjuster
Tension Disc:
Tension tension determines the looseness or firmness of the given stitch where tension disc controls the pressure applied to the thread for uniform feed to the machine needle. The basic funcsions of this device is -
- Correct placement of the thread to the needle
- Regulate the flow of the thread
- Execute the stitching operation smoothly
- Ensure the thread passage properly
There are of two different types device as direct tension device and indirect tension device. In high speed modern sewing machine, the tension dial with numbers graduated on it is used for varying the tension. The higher the number the greater the tension and vice versa. To get straight seam line tension needs to be adjusted correctly.
Image: Tension Disc
Needle and Needle Clamp:
The needle fits into the needle bar that holds it in place with a small screw. The clamp is really required to fix up the needle in correct place.
Image: Needle and Needle Clamp
Take up Lever:
This lever moves up and down direction during the stitch formation to give the supply of thread while the loop is formed and taken back the needle thread after each stitching to set the stitch. Thread tension is also maintained at optimum level by this lever.
Image: Take Up Lever
Presser Foot:
The pressure foot is very important element to perform the stitch. It helps to grab the fabric and place to the feed dog, thus the feed dog moves the fabric through out the machine. A downward pressure is applied by this device on the material.
Image: Presser Foot
Presser Dial:
The presser dial determines the amount of pressure to be applied on the fabric by the presser foot. The most light weight fabric needs maximum amount of presser to control the fabric in better way and thus vice versa.
Image: Presser Dial
Presser Foot Lever:
Functionally presser foot lever moves up and down to engage and disengage the presser foot on to the fabric respectively
Image: Presser Foot Lever
Feed Dog:
This is the another most important part of sewing machine which looks like teeth that function in combination with the presser foot to move forward the fabric after performing one stitch. SPI is also be set that is regulated by the feed dog.
Image: Feed Dog
Face Plate:
It is just a cover that conceals all the internal working elements of the machine.
Image: Face Plate
Throat Plate:
It's the upper part that covers the bobbin and the feed dog so that whole of the elect does not see from out side. It contains some slot for the feed dog and there is a hole to pass through the need to catch the bobbin thread.
Image: Throat plate
Bobbin Case:
The bobbins are set into the bobbin case manually and then set it with the machine. This is placed under the needle plate and usually has a piece of plastic that flips up tot cover the bobbin case when sewing is not performed.
Image: Bobbin Case
Bobbin:
A small package that is winded to carry out the sewing thread and is fitted into the bobbin case. Bobbin winder is used to filled it up and thread is evenly distributed while stitching is performed.
Image: Bobbin
You Can Also Like:
- Garments quality checking in production
- Sewing thread consumption procedure
- International wash care instructions used in garments
- Garments costing procedure
- Progressive bundle system of garments production
- Garment production systems
- garment sewing machines overview
- Fabric consumption formula for woven garments
- Technologies of modern cutting room
Advertisements